Install PostgreSQL on Windows
PostgreSQL is a powerful, open-source relational database system. It’s available on all major operating systems, and has a proven track record of reliability and extensibility. PostgreSQL has been proven to be highly scalable both in the quantity of data it can manage and in the number of concurrent users it can accommodate.
Let’s get it installed on Windows.
Install PostgreSQL on Windows
There is a PostgreSQL installer distributed by Enterprise DB (EDB), an enterprise-level Postgres solution. Download the Windows installer from EDB, and follow the steps. https://www.enterprisedb.com/downloads/postgres-postgresql-downloads
Keep note of what is set as the installation directory. The default location is a C:\Program Files\PostgreSQL\[##] directory, where [##] is the numerical version number of the installation. For example, the installation directory for version 14 is C:\Program Files\PostgreSQL\14\.
Keep note of the password set for the default user as well.
1. Configure binary paths
The PostgreSQL installation comes with a library of binary executables. These executables, such as psql, pg_dump, and createdb, live within the /bin directory of the installation folder, and are how a computer user or different program can interact with the database server. The binary path of my version 14 Postgres installation is C:\Program Files\PostgreSQL\14\bin\. Yours will be in the installation directory specified in the wizard suffixed with \bin\.
Note: Within any software package, binary files and executables are placed within a directory named \bin\ by convention.
Add the binary path to $PATH
To be able to interact with the database servers, we will need to be able to run the executables from the command-line. For this, add the binary path to the system’s $PATH variable
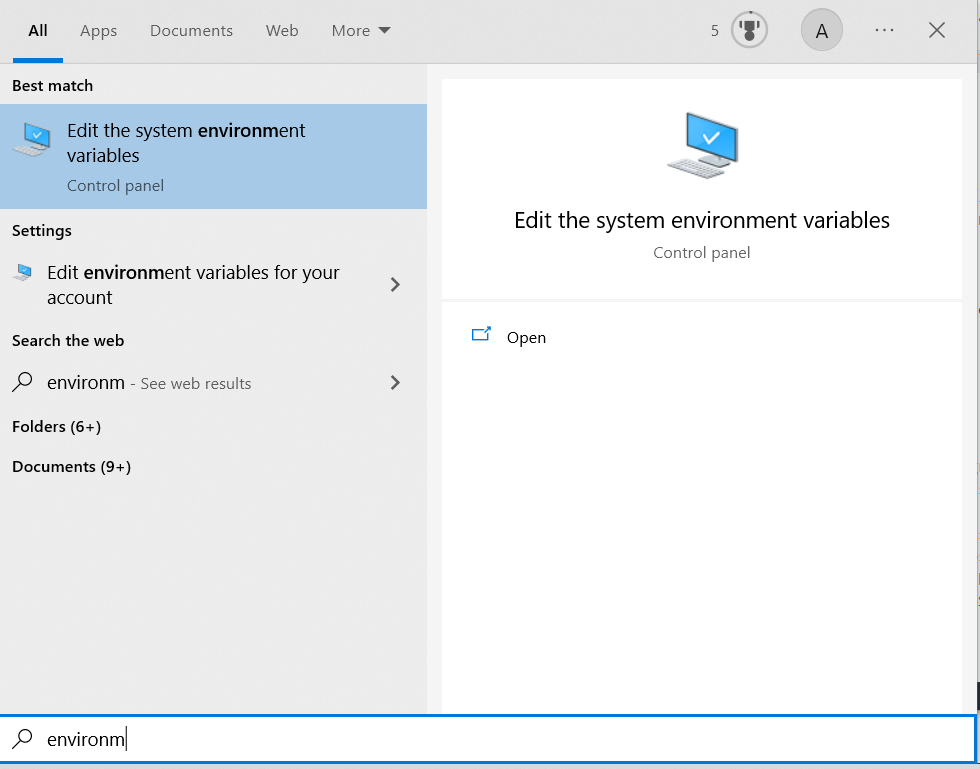
\1. Search Windows for the Edit System Environment Variables dialog by pressing Windows key and typing “environment variables”. Select the result, and a System Properties dialog should appear.

\2. Click “Environment Variables…” at the bottom of the dialog.
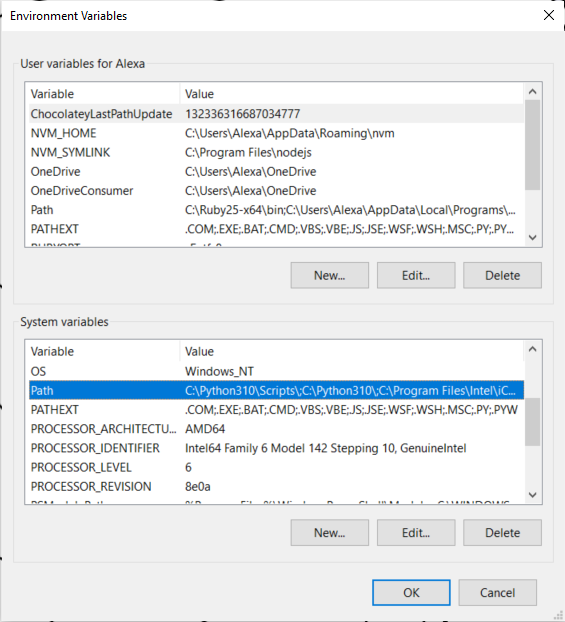
\3. The Environment Variables window is split top and bottom as “User variables” and “System variables”. Within “System variables,” double-click the row for the variable named “Path”.

\4. Within the Edit environment varibale window that appearch, click the New button, and paste the binary path for PostgreSQL.
\5. Click OK on each of the windows opened for this process.
\6. The PostgreSQL executables have been added to the $PATH. To test this, start a new terminal instance and psql to see the output of the command.
Add the binary path to pgAdmin
The EDB installation wizard installs the pgAdmin program, a graphical interface for PostgreSQL. This is can be an alternative interface to access database servers, databases, tables, and other
- Login to pgAdmin as the default user, postgres, using the password set within the installation wizard.
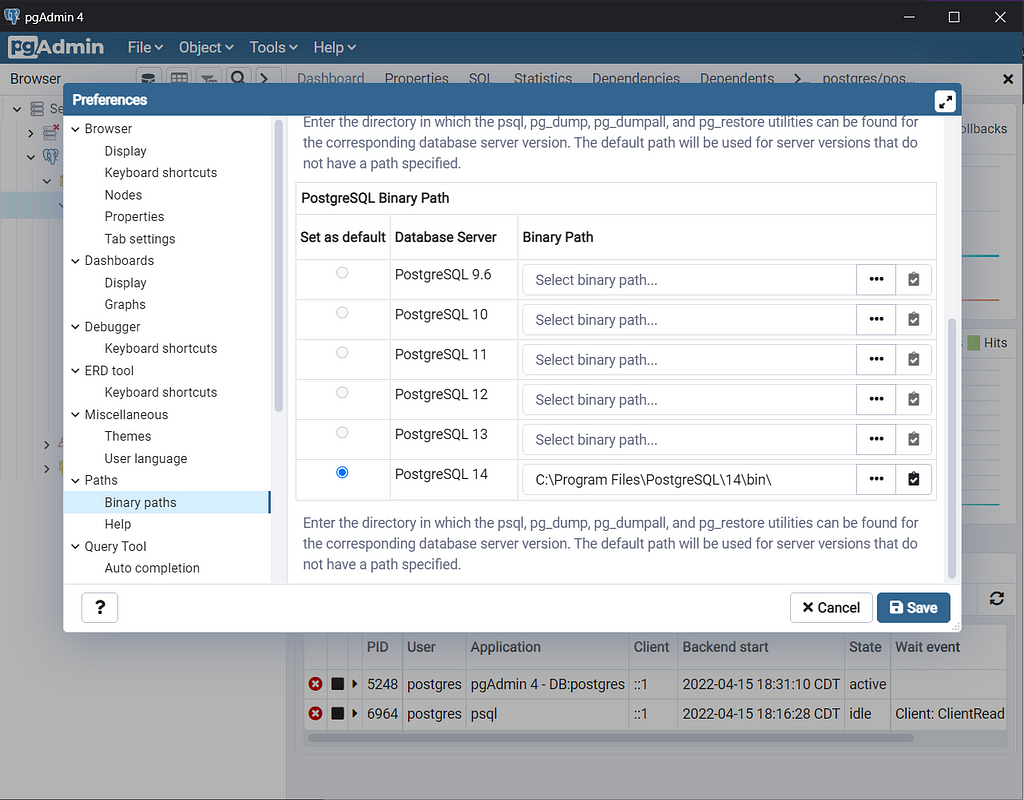
- Open Preferences dialog, and add the binary path to the version of Postgres you have installed. The location for this is found at File > Preferences > Paths > Binary Paths > PostgreSQL Binary Path > [YOUR_VERSION].

2. Start the Database Server
The pg_ctl command is used to manage Postgres database servers. Start and stop a database server by specifying the data directory, and supplying the start or stop subcommand, respectively. The data directory was set in the installation wizard. It defaults to [POSTGRESQL_INSTALLATION_DIRECTORY]\data\
> pg_ctl restart -D C:\Program Files\PostgreSQL\14\data\
> pg_ctl stop -D C:\Program Files\PostgreSQL\14\data\
> pg_ctl start -D C:\Program Files\PostgreSQL\14\data\
The subcommand restart does what you think.
3. Create a non-default user
The createuser command is used to create PostgreSQL users. Note that this is a separate list of users than the Windows login users. For example, it is common to create a separate user per software application with database access.
> createuser --superuser --pwprompt --username=postgres $Env:Username
This command:
- creates a user
- with superuser privileges
- prompts for the user’s password after creation (necessary)
- connects to the database server as the postgres user
- sets the user’s name to $Env:Username, and environment variable within Windows Terminal
4. Create a non-default database
The createdb command is used to create PostgreSQL databases. The database server serves a “database cluster.” A database cluster collection of databases that is managed by a single instance of a running database server. In file system terms, it is a single directory in which all data will be stored (i.e. Postgres’ /data directory.)
The PostgreSQL installer created a default database named postgres. It is convention for each software program to have its own, uniquely-named database. For practice and utility with the psql command in upcoming sections, create a new database named after your Windows user.
> createdb $Env:Username --username=$Env:Username
This command:
- creates a database
- named the logged in user’s username
- connecting as the PostgreSQL user named the same as the logged in user
5. Test the Installation
If all has gone well, you have the PostgreSQL command-line tools, a running database server, and a user and database within that server. Test all of these by issuing the psql command from the command line. This command defaults to connecting with a username of the currently logged in user, and connecting to a database with the same name as the logged in user. This simple command will test all three aspects of installation.
> psql
References
Managing Postgres users and privileges: https://kb.objectrocket.com/postgresql/how-to-list-users-in-postgresql-782
PostgreSQL Security Best Practices: https://resources.2ndquadrant.com/hubfs/Whitepaper PDFs/PostgreSQL_Security_Best_Practices_Whitepaper.pdf
How to start PostgreSQL on Windows: https://stackoverflow.com/questions/36629963/how-can-i-start-postgresql-on-windows
This article was originally posted as Install PostgreSQL on Windows at alexa-anderson.com.
Written: April 18, 2022
Last updated: September 23, 2024
